
TLDR: Learn how to implement a simple websocket server-client application that takes pynput data and sends it to a client
Programing Python WebSockets

Background
I always wondered how hardware devices, motion detectors, heat sensors, etc gave live updates to the client (frontend). Before, I only worked with standard HTTP requests. If a user wanted information, it would send a request to the server, the server would then parse that request, prepare some information, and send something back to the client. HTTP is not meant for continious connections between a client and a server. HTTP are short-lived.
So what if you wanted to create something like a chatroom, or in this case, take live data gathered from sensors, and continiously send data to the client as long as the client is connected. Previously, most websites implement something called long polling, but here we introduce WebSockets. Websockets are used to implement long-lived connections, better for real-time, ongoing connections.
So why not just make repeated HTTP requests at intervals? The main reason is that they are event-driven, less latency, and less overhead. This is a small project to learn how to use websockets. The code can be found here.
Environment
I am running python 3.8 and using node version v16.18.1 on ubuntu, but this should be replicable in any operating system (for mac os, you will have to allow vscode to track mouse movement).
Abstract
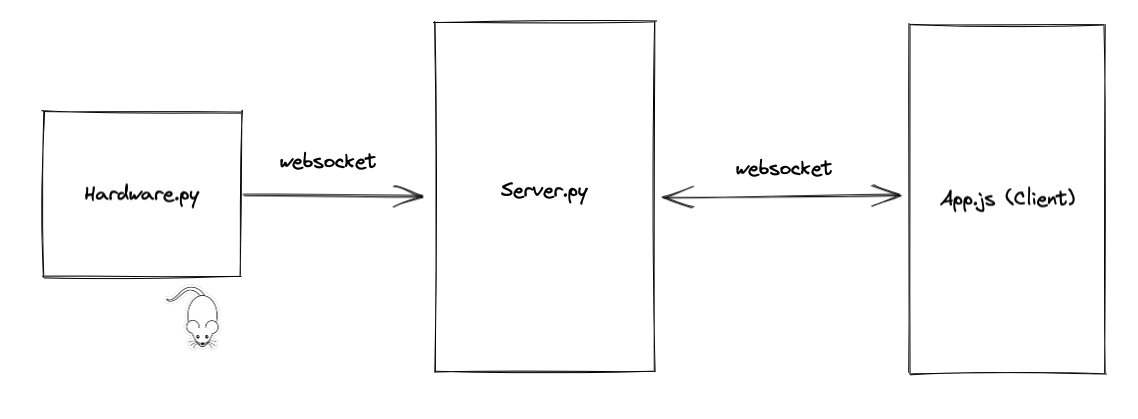
Although I have a rasberry pi, I don’t have any sensors to go with it. So, instead, I used the pynput python library to continiously track mouse movement on my laptop, send that data to a Websocket server, and then forward that to the frontend, which is a simple react client interface that receives the mouse information.
Experiment
Project filepath
1
2
3
frontend/ # react app (client)
server.py # websocket server
hardware.py # hardware data script (client)
To sum it up, hardware.py contains code for getting realtime mouse movement data, which it pushes to the websocket server (through a socket connection), which then transfers that data to the client when the client connects.
Hardware.py
Hardware.py is a script that utilizes pynput to track mouse movement, and sends it to the websocket server through a websocket conncetion. You can track things like mouse click, movement, and scroll. Here we just introduce mouse clicks. We utilize the https://pypi.org/project/websocket-client/ python library to create a connection.
1
2
3
4
5
6
7
8
9
10
11
if __name__ == "__main__":
    # create a connection, and define functions
    ws = websocket.WebSocketApp("ws://localhost:3001",
        on_open=on_open,
        on_message=on_message,
        on_error=on_error,
        on_close=on_close
    )
    ws.run_forever(dispatcher=rel, reconnect=5)  # Set dispatcher to automatic reconnection, 5 second reconnect delay if connection closed unexpectedly
    rel.signal(2, rel.abort)  # Keyboard Interrupt
    rel.dispatch()
In our main, we create a connection without websocket server. Then lets define our on_open, on_message, on_error, on_close.
1
2
3
4
5
6
7
8
9
10
11
12
13
14
15
16
17
def on_message(ws, message):
    """ recieve message from server"""
    print(message)

def on_error(ws, error):
    """ handle errors """
    print(error)

def on_close(ws, close_status_code, close_msg):
    """ handle connection close """
    print("### closed ###")

def on_open(ws):
    print("Opened connection")
    ws.send(json.dumps({"type" : "hardware", "message" : "first connection"}))
    listener = Listener(on_move=on_move, on_click=on_click, on_scroll=on_scroll) # tracks mouse movement
    listener.start()
on_open is called when a connection to the server is made. Here, we create our listener object which tracks mouse movement, we also send a message to our server saying that we have successfully connected, we send a message called “first conncetion” so that our webserver can correctly identify the conncetion, we will go more into depth later.
Lets look at our mouse movement functions.
1
2
3
4
5
6
7
8
9
10
11
12
13
14
15
16
def on_move(x, y):
    """ track mouse movement """
    # print('Pointer moved to {0}'.format((x, y)))

def on_scroll(x, y, dx, dy):
    """ track mouse scroll """
    # print('Scrolled {0} at {1}'.format('down' if dy < 0 else 'up', (x, y)))

def on_click(x, y, button, pressed):
    """ track mouse click """
    keyData = '{0} at {1}'.format('Pressed' if pressed else 'Released', (x, y))
    data = { "type" : "hardware", "message" : keyData }
    # send message only on downpress
    if (pressed == True):
        ws.send(json.dumps(data))
    print(keyData)
Lets look at our on_click, which sends a message to our server when our mouse is clicked using our websocket object ws. Implementing that for on_move and on_scroll is the same. Lets see what we get when we run python3 hardware.py and server.py along side it, or else it will show an error, [Errno 111] Connection refused. Simply remove the websocket code from hardware.py if you want to just print mouse movement.
Output for hardware.py.
1
2
3
4
5
6
7
8
9
10
11
Opened connection
Pressed at (800, 879)
Released at (800, 879)
Pressed at (458, 372)
Released at (458, 372)
Pressed at (1206, 291)
Released at (1206, 291)
Pressed at (823, 312)
Released at (823, 312)
Pressed at (758, 832)
Released at (758, 832)
Lets look at some server.py output
1
2
3
4
5
6
7
8
9
10
11
12
13
('127.0.0.1', 45896)
hardware has connected
From Hardware: {"type": "hardware", "message": "first connection"}
client has not yet connected
From Hardware: {"type": "hardware", "message": "Pressed at (800, 879)"}
client has not yet connected
From Hardware: {"type": "hardware", "message": "Pressed at (458, 372)"}
client has not yet connected
From Hardware: {"type": "hardware", "message": "Pressed at (1206, 291)"}
client has not yet connected
From Hardware: {"type": "hardware", "message": "Pressed at (823, 312)"}
client has not yet connected
From Hardware: {"type": "hardware", "message": "Pressed at (758, 832)"}
As we can see, for each mouse click, hardware.py transmit that data to our server. We have not run our client.js, So it shows that the client has not yet been connected. Next lets look at the client interface.
Client
Our client is a simple react app created using npx create-react-app frontend. I am running the code with v16.18.1 (npm v8.19.2). Using npm run

Run
npm installbefore runningnpm start
It opens a connection with the server, and continiously listens for messages. Lets look at the code. WebSocket, as an IETF standard, and with a W3C browser API, is fully supported by all modern browsers, thus we don’t need to install anything through npm install, and can be directly used.
1
2
3
4
5
6
7
8
9
10
11
12
13
14
15
16
17
18
19
20
21
22
23
24
25
26
27
28
29
30
31
32
33
34
35
36
37
38
39
40
41
42
43
44
45
46
47
48
49
50
51
52
53
54
55
56
import React from 'react';
import './App.css';

function App() {
  const socket = new WebSocket('ws://localhost:3001');          // create new socket connection
  const [message, setMessage] = React.useState("no message");

  // on connection opened
  socket.addEventListener('open', function (event) {
    console.log('ws connected');
    socket.send(JSON.stringify({
      type: "client",
      message: "first connection"
    }))
  });


  socket.addEventListener("message", ({ data }) => {
    const packet = JSON.parse(data);
    console.log(packet)
    switch (packet.type) {
      case "hardware":
        setMessage(packet.message)
        break;
      default:
        break;
    }
  });

  // click button to send message to server
  const onClickSend = () => {
    if (socket.readyState !== WebSocket.OPEN) {
      console.log("socket not open");
      return;
    } else {
      socket.send(JSON.stringify({
        type: "client",
        message: "this is from client"
      }));
    }
  }

  // detect tab close, remove websocket connection in webserver
  window.addEventListener("beforeunload", function (event) {
    socket.send(JSON.stringify({type: "client", message: "disconnect"}));
  });

  return (
    <div>
      <h1> WebSocket </h1>
      <button onClick={onClickSend}>click button</button>
      <div>{message}</div>
    </div>
  );
}
export default App;
socket.addEventListener('open', function (event) { is activated wehn a connection is initiated. Again, we see the client send a “first connection” message to the server. There are better ways of giving specific ids to clients (for server to differentiate), but I did not implement it in this simple setup. Then the socket.addEventListener("message", ({ data }) function handles incoming messages from the server. Often, we can use a simple switch statement to handle different types of messages from the server, perhaps to update different parts of the webpage. There is also a button that sends a message to the server to show that the conncetion is full-duplex (both ways).
Websocket.py
Finally, lets discuss what happens under the hood in server.py. The principle behind is quite simple. Handle socket connections from the hardware.py client and the react client, then transfer the information pushed from our mouse tracking program and transfer it to the react client. We also show that it can handle messages from the react client.
1
2
3
4
5
6
7
8
9
10
11
12
13
14
15
16
17
18
19
20
21
22
23
24
25
26
27
28
29
30
31
32
33
34
35
36
37
38
39
40
41
42
43
44
45
46
47
48
49
50
51
52
53
# server

import asyncio
import websockets
import json

connected_clients = {} # store websocket connections
async def handler(websocket):
    print(websocket.remote_address)

    # handle incoming messages from websocket
    async for data in websocket:
        try:
            # unpack json object
            json_packet: dict = json.loads(data)
            user_id = json_packet["type"]
            message = json_packet["message"]

            # save client on open connection
            if (message == "first connection"):
                print(user_id, "has connected")
                connected_clients[user_id] = websocket

            # if disconnect, remove from dict
            if (message == "disconnect"):
                connected_clients[user_id].pop(user_id)

            # check if id exists
            if user_id in connected_clients:
                # if message is from hardware, send to react client
                if (user_id == "hardware"):
                    print(f"From Hardware: {data}")
                    try:
                        await connected_clients["client"].send(data)
                    except:
                        print("client has not yet connected")
                else:
                # if message is from client, just print
                    print(f"From Client: {data}")
            else:
                print("users not all connected")

        except websockets.exception.ConnectionClosedOK:
            print("error")
            return


async def start_server():
    async with websockets.serve(handler, "", 3001,):
        await asyncio.Future()

if __name__ == "__main__":
    asyncio.run(start_server())
Here we introduce asyncio, which is quite complex in itself. In general, it is a library to write concurrent code using the async/await syntax. But we don’t need to fully understand that right now. In short, we start a webserver using asyncio.run which handles connections on port 3001 at ws://localhost. asyncio.Future() ensures that it runs forever until we manually close the program. Our handler function contains the main logic for sending the data to the right client.
In the handler function, in short, the flow of data is pretty much one-directional. hardware.py collects data, sends it to the server, and the server distributes it to the correct client. In order to do this, we have to correctly “id” the connections, so we know who to send the data to. I used a python dict to store two websocket conncetions, one from react client, and one from hardware. Thus we can differentiate the two websocket connections, and only send hardware data to the client, but messages from the react client will NOT be transfered to the hardware.
Let’s run all three programs, and see the result!
We can see everything works at expected.
Conclusion
This was my introduction to websockets, and I hope that it has helped you. This example is fairly simple, but I always wanted to create my own IoT real-time home monitoring system, and I believe this is a step toward that direction.
What’s Next?
There are many things I want to try next:
- use real external hardware device to get live data from raspberry pi
- connect to websocket server from client outside of”ws://localhost:PORT”
- try out node.js as websocket server instead of python, and compare the differences
- become more familiar with
asyncioandwebsocketto handle more complex server tasks - server to handle multiple client connections at the same time
Thanks for reading!